
Building a new house in Los Angeles is exciting but complex. To help you navigate, we’ve broken down the process into 35 clear steps – from finding a lot to closing – so you know what to expect at each stage.
Pro Tip: Connect with an expert early. Tricia Watts – owner of MaxNet Homes in Los Angeles – suggests working with a reputable builder or real estate professional at the very beginning. Local expertise can help you find a great lot, navigate permits, and manage the process of building a home smoothly.
Now, let’s walk through each stage of construction, from finding a lot to closing on your new home.
Steps 1–7: Finding and Preparing the Site
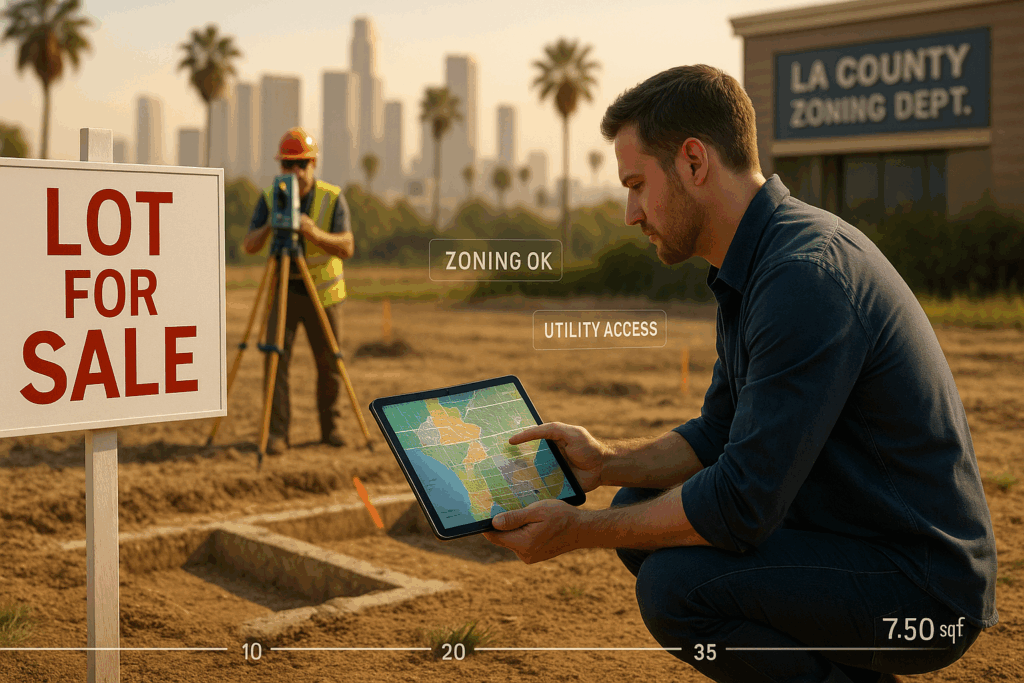
Step 1: Find and Purchase the Right Lot – Secure a buildable piece of land in your preferred Los Angeles area. Check local zoning and utility access to make sure you can construct a home there.
Step 2: Choose the Type of New Home – Decide on the type of build that suits you: a spec home (builder-initiated with limited customization), a tract home (a new house in a planned development with set floor plans), or a custom home (designed from scratch for complete personalization).
Step 3: Assemble Your Building Team – Hire a general contractor or custom home builder to coordinate the project and manage all the subcontractors (plumbers, electricians, etc.). You may also hire an architect for custom plans. A solid team makes the home construction process much easier.
Step 4: Obtain City Permits – Make sure to secure all required building, electrical, plumbing, and HVAC permits before any construction begins. Don’t start construction until you have these official approvals from the city.
Step 5: Clear the Land – Prepare the lot by removing any existing structures, trees, or debris where the house will sit. By the end of this step, the site is clean and open, ready for construction.
Step 6: Level and Grade the Site – Excavation crews grade the land to create a flat base for the foundation. On a sloped lot, this may involve cutting into the hill or adding soil to form a level pad.
Step 7: Prepare for the Foundation – The crew digs trenches and holes for the foundation based on your home’s layout. These excavations mark where footings and foundation walls will go. (If your home includes a basement or crawl space, a larger area is excavated.) Now the outline of your house is visible in the ground.
Steps 8–14: Building the Structural Shell
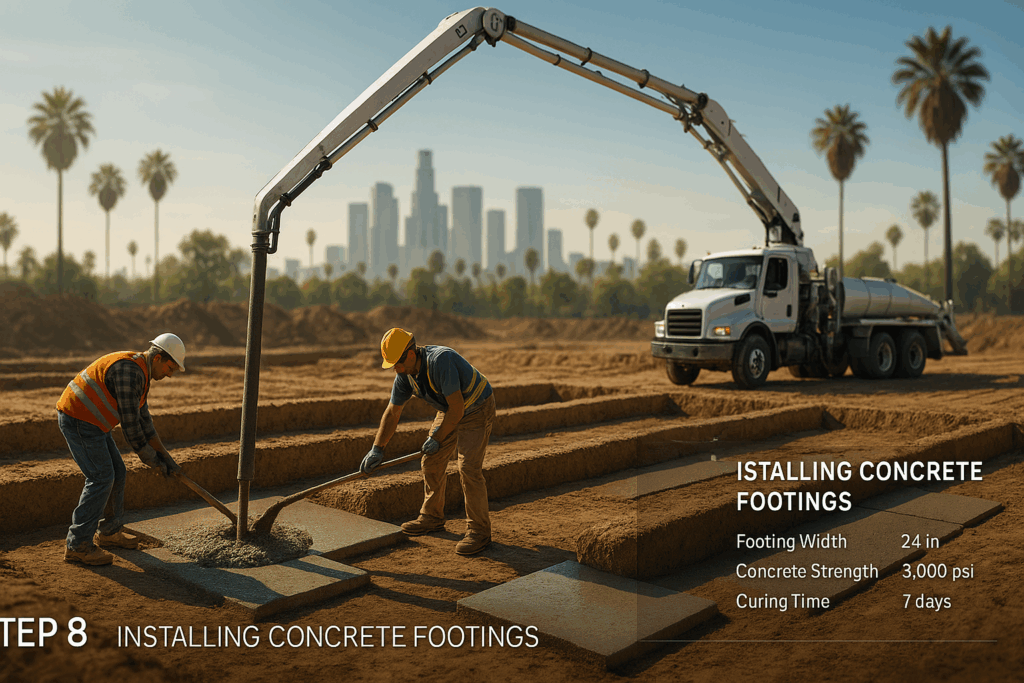
Step 8: Install Footings – Pour concrete footings in the trenches. Footings are wide concrete pads that support the foundation walls and spread the house’s weight into the soil. Once the concrete sets, you have a solid footing system in place.
Step 9: Pour the Foundation – Build the foundation walls or slab on top of the footings. This could be a slab-on-grade concrete foundation or poured concrete/block walls for a crawl space or basement. The concrete is poured into forms and left to cure. When finished, your home has a sturdy foundation to build upon.
Step 10: Install Underground Utilities – Before filling the foundation trenches, plumbers install the main sewer line and other necessary lines under the foundation. After these pipes are in place, the trenches are backfilled with soil.
Step 11: Foundation Inspection – A city inspector verifies the foundation (and any underground plumbing) is sound and built to code. Once this step is approved, you’re cleared to start building the structure above.
Step 12: Frame the House – Carpenters frame the house – constructing the floors, walls, and roof structure. The basic shape of your home now comes together, with all rooms and openings outlined by lumber.
Step 13: Add Sheathing – Attach plywood or OSB sheathing to the exterior wall frames and roof. This encloses and strengthens the structure. A protective house wrap is then applied over the wall sheathing to keep moisture out. At this stage, the house has walls and a roof, though exterior finishes are still to be added.
Step 14: Install Windows and Exterior Doors – Put in all the windows and exterior doors. They are secured into the framed openings and sealed to prevent leaks. With windows and doors installed, the house can be “dried in” – the interior is protected from weather, and the building can be locked for security.
Steps 15–22: Interior Systems and Rough Inspections
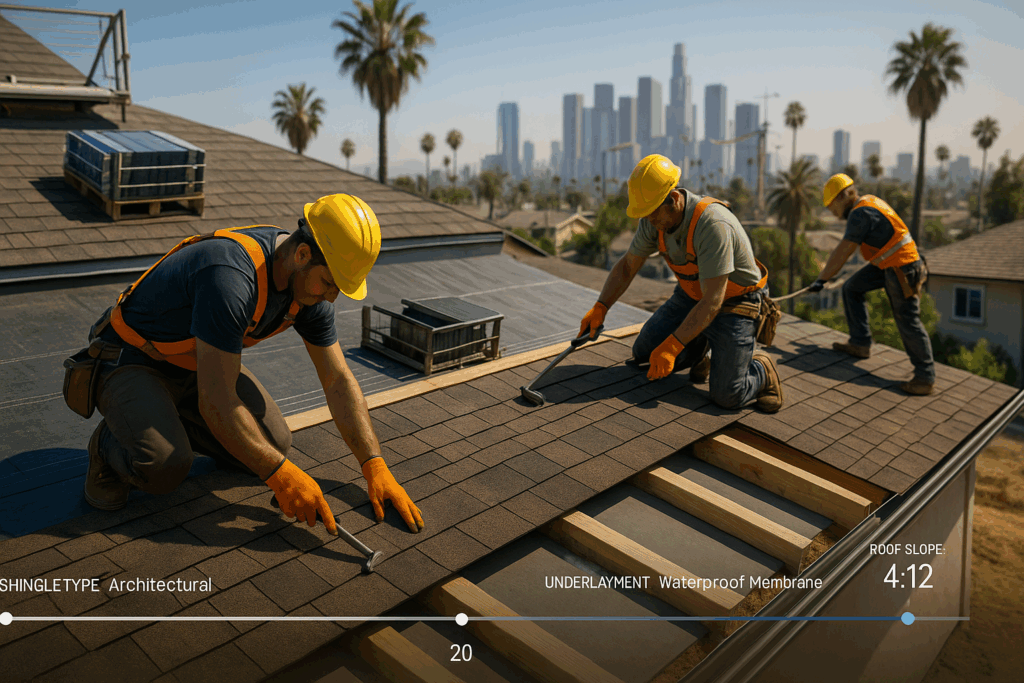
Step 15: Install Roof Covering – Complete the roof by installing the final roofing material (shingles, tiles, etc.) over the roof sheathing. This fully seals the house from above and protects it from rain.
Step 16: Rough Plumbing – Plumbers run water supply and drain lines through the interior walls and floors. They route pipes to the kitchen, bathrooms, laundry, and any other areas that need plumbing. (Tubs or shower bases might be set in place now as well.) After rough plumbing, you’ll see pipes stubbed out where sinks, toilets, and appliances will connect.
Step 17: Plumbing Inspection – A plumbing inspector examines the installed pipes to ensure everything is up to code and there are no leaks. They might pressurize the lines to test for leaks. Passing this inspection means the plumbing work so far is approved.
Step 18: Rough Electrical – Electricians run wiring throughout the house. They install cables for all outlets, switches, and light fixtures according to the electrical plan, threading them through studs and along ceilings to the breaker panel location. (They’ll also set up wiring for systems like your internet or security, if planned.) At this stage, all electrical boxes and wires are in place, though nothing is connected to power yet.
Step 19: HVAC and Electrical Inspections – City inspectors review the rough electrical and HVAC installations and sign off when everything is up to code. Once these inspections are approved, you can proceed to the next phase (closing up the walls).
Step 20: Install Insulation – Add insulation to exterior walls and the attic. Commonly, fiberglass batts are placed between wall studs and in ceiling joists to meet energy standards. Proper insulation will keep your home comfortable and efficient by helping to regulate indoor temperatures.
Step 21: Hang Drywall – Hang drywall (sheetrock) panels on the interior walls and ceilings. The panels are screwed in place, then seams and screw holes are taped and mudded (covered with joint compound) to create smooth surfaces. Once the compound dries and is sanded, the walls and ceilings are solid and ready for finishing. The interior really starts to look like a home now.
Step 22: Prime and Paint Interior – Apply primer and then paint to all the interior walls and ceilings. This is when your chosen colors make each room come to life. With fresh paint, the inside of the house feels clean and finished.
Steps 23–30: Finishes and Fixtures
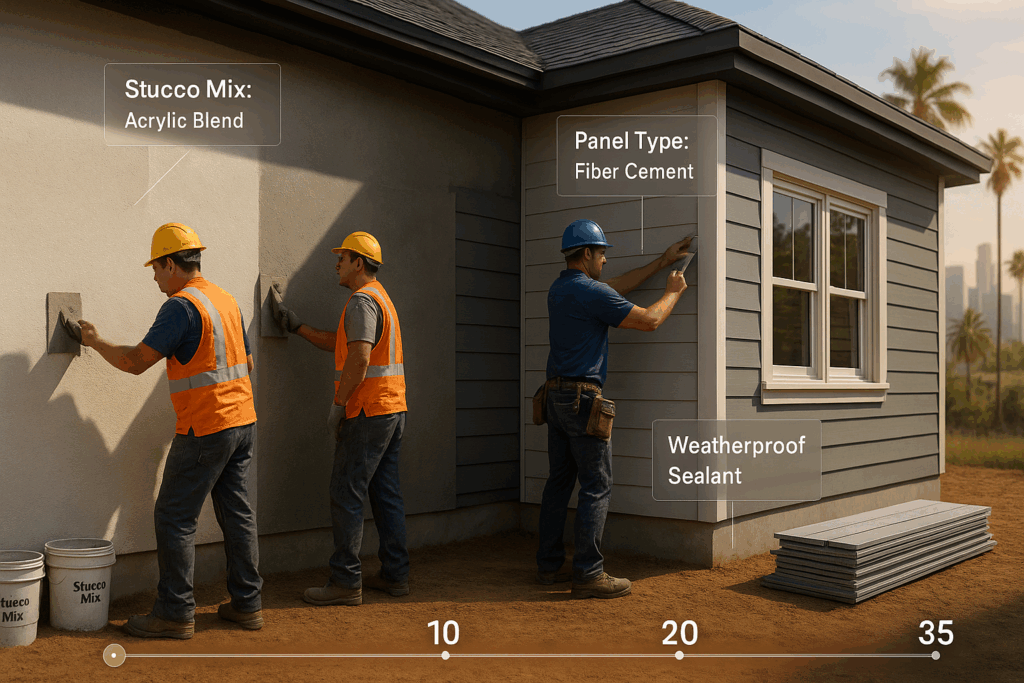
Step 23: Finish Exterior Surfaces – Apply the final exterior finish (stucco or siding) to complete the outside of the home. If your design uses stucco, it’s troweled on now (providing the house’s color and texture). If using siding, the boards or panels are installed along with any exterior trim. The home’s exterior is now fully finished and weatherproof.
Step 24: Install Flooring – Lay down your flooring materials throughout the house. This includes installing hardwood or laminate in living areas, tile in bathrooms, and carpet in bedrooms (as chosen in your design). Flooring is done after painting is finished, and once it’s in, the interior floors are complete.
Step 25: Install Cabinets – Mount the kitchen cabinets and bathroom vanity cabinets in their proper places. Now the kitchen has its cabinets installed, and the bathrooms have their vanities, defining where sinks and storage will be.
Step 26: Install Interior Trim and Doors – Nail up baseboards along the floors and casings around windows and interior door frames. Hang all the interior doors (bedroom, bathroom, closet doors) and attach the knobs or levers. This trim work covers any gaps and gives each room a polished look.
Step 27: Install Light Fixtures and Outlets – Electricians return to install all the light fixtures (ceiling lights, recessed lights, fans) and attach cover plates to every outlet and light switch. They also connect the electrical panel and turn the power on. At this stage, your lights and outlets are working – the electrical system is fully functional.
Step 28: Install Countertops and Appliances – Install countertops in the kitchen and bathrooms, then put in the major appliances (stove, refrigerator, dishwasher, etc.) and connect them to the necessary utilities. With appliances like the oven, fridge, and dishwasher in place (and the kitchen sink hooked up), your kitchen becomes functional.
Step 29: Install Bathroom Fixtures – Finish the bathrooms by installing toilets, sinks, and faucets, and attaching showerheads and tub spouts. Plumbers connect all these fixtures to the water lines and drains and test them. Now the bathrooms have running water, flushing toilets, and working showers/tubs.
Step 30: Final Touches and Clean Up – Complete any remaining details inside and prepare the house for inspections. Hang mirrors in the bathrooms and install any remaining hardware (towel bars, closet shelves, etc.). Then the entire home is thoroughly cleaned to remove dust and debris. At this point, your house is fully finished inside.
Steps 31–35: The Home Stretch

Step 31: Complete Landscaping – Finish the landscaping outside – plant grass or drought-tolerant plants and tidy up the yard. Any walkways, driveways, or other hardscaping are completed so the exterior of the home looks as good as the interior.
Step 32: Final Inspection – A city inspector performs a last inspection of the completed home. They verify that everything in the house (electrical, plumbing, HVAC, and overall construction) meets safety codes. If all is well, you receive a Certificate of Occupancy, officially deeming the house safe to live in.
Step 33: Final Walkthrough with Builder – Together, you inspect the finished home in detail with your builder or contractor. This is your chance to spot any minor issues or imperfections (the “punch list,” such as a paint touch-up or cabinet adjustment). The builder will fix these items so that everything is exactly as it should be.
Step 35: Closing – Complete the paperwork to finalize your new home. You’ll sign all the necessary documents and handle any remaining payments. Once closing is finished, the keys are handed over. Congratulations – the house is officially yours, and you’ve successfully navigated all the steps to building a home!
Building a house has many steps, but the right team makes it manageable. MaxNet Homes can guide you through every phase – from finding land to finishing construction.
Ready to build your dream home in Los Angeles? Contact MaxNet Homes today to get started. We’ll help you navigate every step so you can soon enjoy your beautiful new home.
Latest Posts
- How Much Does a Termite Inspection Cost in Los Angeles?
 Termite Inspection Cost Guide for California Homeowners Imagine enjoying your Los Angeles home’s sunny patio or cozy living room – the last thing you want is a hidden termite colony quietly eating away at your biggest investment. Termites may be tiny, but the damage they cause can lead to huge repair bills if left unchecked. … Continued
 - Rent-to-Own Home Programs: Legit Pathways to Homeownership in Los Angeles
 Are there any legit rent-to-own companies? If you’re an aspiring homebuyer in Los Angeles struggling with a down payment or less-than-perfect credit, you’re not alone. In Southern California’s pricey market, saving up 20% or qualifying for a traditional mortgage can feel daunting. Rent-to-own home programs — also called lease-to-own or lease-purchase programs — offer a … Continued
 - Mobile Home Rent-to-Own in Los Angeles: Pros, Cons, and How to Navigate
 Many Los Angeles home-seekers are feeling priced out of homeownership due to soaring home prices, high interest rates, and strict mortgage requirements. In a market where a modest house can cost over $1 million, some are turning to creative solutions. One option combining affordability with flexibility is rent-to-own mobile homes (also known as lease-to-own manufactured … Continued
 - Seller Credits Explained: 4 Ways Los Angeles Home Sellers Can Close Faster
 Selling a home in Los Angeles today often means facing sky‐high prices and tight buyer budgets. For example, the median L.A. home recently hovered around the high-$700Ks to low-$800Ks, and only about 20% of California households can afford that price. With mortgage rates up near 6–7%, many buyers can qualify for a loan but lack … Continued
 - Flat Fee Real Estate Brokers: Money-Saver or Costly Mistake? (Pros, Cons, and Smart Alternatives for Los Angeles Sellers)
 Selling your home in Los Angeles can feel overwhelming – especially when you realize a traditional real estate agent might charge 5-6% of your sale price in commissions. On a $800,000 L.A. home, that’s $40,000–$48,000 out of your pocket! It’s no surprise that many homeowners start searching for ways to save money on realtor fees. … Continued
 - What Upgrades Increase Home Value in Los Angeles? 15 High-ROI Improvements Buyers Love
 Los Angeles, CA – If you’re a homeowner in Los Angeles looking to sell, you might be asking: what upgrades increase home value in our area? In a competitive market like L.A., making the right improvements can help your property stand out and attract higher offers (potentially even all-cash offers). At MaxNet Homes, we’ve seen … Continued
 - What Home Appraisers Look for in a House: Los Angeles Seller’s Guide
 Selling a home—especially under pressure from foreclosure, divorce, or a sudden move—can feel overwhelming. One of the biggest hurdles is the home appraisal, which determines the appraised value your bank or buyer will accept. The appraiser’s report can make or break a sale: if the home appraises low, a buyer’s loan can fall through or … Continued
 - What Is a Cash Offer in Real Estate? A Straightforward Guide for Los Angeles Homeowners
 Introduction:In a competitive real estate market like Los Angeles, you might hear the term “all-cash offer” thrown around as a big advantage for both buyers and sellers. But what exactly is a cash offer on a house, and why does it matter? In simple terms, a cash offer means the buyer is purchasing the property … Continued
 - We Buy Houses for Cash in Los Angeles: Pros, Cons, and How It Works
 Introduction:“We buy houses for cash!” You’ve likely seen these signs posted at busy Los Angeles intersections or received postcards saying “We buy your house – any condition, fast cash.” For homeowners facing tough situations like foreclosure, divorce, inheriting an unwanted property, or other financial distress, these ads can be very tempting. The promise is simple: … Continued
 - How Much Do Real Estate Agents Make on a Home Sale?
 When you sell your house, it’s natural to wonder how much your real estate agent will make from the sale. Real estate agents typically earn money through a commission, which is a percentage of the home’s sale price. In fact, the average Realtor commission has traditionally been between 5% and 6% of the sale price. … Continued
 - LA Real Estate Trends 2025: Expert Market Analysis and Property Investment Insights
 The U.S. housing market has been riding a roller coaster of record-high prices, rising interest rates, and shifting demand. Across the nation, real estate trends are evolving in unprecedented ways – from historically low sales volumes to inventory levels climbing back from extreme lows. In such a dynamic environment, expert-backed guidance is more important than … Continued
 - Cash Home Offers Surge in 2025 Los Angeles Housing Market – Helping Homeowners Sell Your House Fast
 Los Angeles Housing Market Update: The Los Angeles housing market in 2025 remains dynamic and competitive. Median home prices are hovering around $800,000 in early 2025 – about 9% higher than last year. Homes are selling in just over a month on average (roughly 45 days on market for a typical listing), slightly faster than … Continued
 - Selling Your Los Angeles House for Cash: What to Know Before You Decide
 Selling a house is never a one-size-fits-all situation. If you’re a Los Angeles homeowner facing a tough circumstance – perhaps foreclosure, probate, divorce, a sudden job relocation, or an inherited property you can’t keep – you might be thinking, “Maybe I should sell my house for cash and just be done with it.” It’s an … Continued